
Visual Meta Description:
A six-phase prompt-driven system for converting widget-heavy WordPress posts built in Elementor or Divi into clean semantic HTML — without changing a single word of the original content.
Semantic HTML
Div Soup Fix
Bones Joints Cartilage
SlideShift Refactor
HTML to Semantic HTML: A Prompt-Driven Workflow for Refactoring WordPress Posts
Your post looks fine. The design is clean, the images load, the text is readable. Open it in a browser and nothing looks wrong. Run Ctrl+U and look at the source code, and what you find underneath is a different document entirely — a layered architecture of nested divs, inline styles, empty spans, and structural containers that have nothing to do with what your post is saying and everything to do with how your page builder rendered it visually.
That’s the gap drag-and-drop page builders like Elementor and Divi create between what a post looks like and what a machine reads. The visual layer is clean. The structural layer is noise. And the machine — whether that’s a search crawler evaluating your semantic hierarchy or an AI answer engine deciding whether to cite your domain — reads the structural layer, not the visual one.
This post documents the workflow that closes that gap. Not a one-time tidy-up but a repeatable six-phase system that takes a widget-heavy WordPress post from div soup to clean semantic HTML without losing a single word of the original content.
Is HTML Cleanup Worth It for a Post That Already Looks Fine Visually?
Yes. The reason is worth stating precisely before the workflow begins.
A page builder like Elementor or Divi builds your post by wrapping every element — every paragraph, every heading, every image — in a series of structural containers designed to make the visual layout work across different screen sizes. Those containers are useful for the renderer. They are noise for the parser.
What Div Soup Actually Costs You
When a search crawler ingests your page, it doesn’t see the rendered layout. It reads the source HTML, the same document Ctrl+U reveals. Every nested div that exists purely for visual alignment is a structural signal the crawler has to parse before it reaches the actual content. Every inline style applied by the page builder is markup the machine processes and discards. Every empty span used for spacing is a dead end in the document tree.
The technical term for this accumulation is div soup. The SEO consequence is a document that is harder to ingest, slower to parse, and structurally less clear about what it is actually saying.
What Semantic HTML Gives the Machine Instead
A page with clean semantic HTML communicates its entity relationships to a machine the same way a well-organised argument communicates to a human reader. Headings in correct hierarchical order, paragraphs in plain <p> tags, lists in proper <ul> and <li> structures, images in <figure> tags with didactic alt text. The structure supports the meaning instead of obscuring it.
The post that looks fine visually but reads as structural noise to a crawler is the post that fails the audit it never knew it was taking.
The difference between what a post looks like and what a machine reads is the URL-level vs HTML-level audit distinction — and it’s the gap most compliance tools have no mechanism to detect.
What This Workflow Produces
Before detailing the six phases, here is the end state so the investment is clear. A post that goes through the full HTML to semantic HTML workflow comes out the other side with:
- Clean semantic HTML structure with no div soup, no inline styles, no empty containers
- A corrected heading spine in proper H1 through H3 sequential hierarchy with no skipped levels
- Internal links wired correctly with natural bridge sentences rather than force-fitted anchor text
- Refactored images converted to optimised WebP assets with didactic alt text that teaches the crawler what each image means in context of the post’s argument
- Semantic keyword reinforcement at every cartilage injection point between text blocks and images
- A machine-readable document that declares what the post means in the structural layer, not just the visual one
The specific post this workflow was first applied to on Native 1 — “Word Order in English ESL: The Block Method for Clear Sentences” — was a widget-heavy Elementor build with embedded teaching images that were invisible to crawlers because they carried no contextual alt text. The post taught English sentence structure through visual diagrams. The diagrams were the teaching. The machine couldn’t read them. After the full strip and rebuild, the images became indexed visual assets with didactic alt text, the heading spine was corrected, five internal links were wired in through natural bridge sentences, and the post went from machine-invisible to structurally citable.
You don’t need to understand code to execute this workflow — you need to understand what the code is supposed to do, which is a different skill entirely.
Phase 1 — The Strip Prompt
The first prompt has one job: take the messy source HTML and return a clean, structurally correct document with every word preserved verbatim. Retrieve the source HTML of your post by pressing Ctrl+U in your browser. Copy the full source. Feed it to your AI with this prompt:
ROLE: Clean HTML Assistant
MISSION: Strip away all messy website code and return a clean,
structured HTML document.
TASK: Reconstruct the text provided below into clean, basic HTML.
UNBREAKABLE RULES:
1. DO NOT CHANGE ANY WORDS: Keep every single sentence, word, and
   punctuation mark exactly the same. Do not edit, rewrite, or
   shorten the text.
2. STRIP THE CLUTTER: Remove all messy container divs, spans, empty
   paragraphs, styles, and custom classes.
3. KEEP THE HEADINGS: Use standard HTML tags to show the hierarchy:
   - Use <h1> for your main title.
   - Use <h2> and <h3> for sub-headings.
   - Wrap normal paragraphs in <p> tags.
   - Use <ul> and <li> for bullet lists.
   - Use <strong> for bold text.
INPUT DATA:
[Paste your messy HTML here]
What the Strip Prompt Preserves and What It Removes
The Strip Prompt preserves every word, sentence, and punctuation mark from the original post without exception. It removes structural containers, inline styles, empty spans, and class names that exist solely for the page builder’s visual rendering. What comes back is the post’s actual argument visible in clean code for the first time.
This is not a content edit. It is a structural excavation. The writing underneath the div soup was always there. The Strip Prompt clears the noise around it.
Phase 2 — The Switchboard Prompt
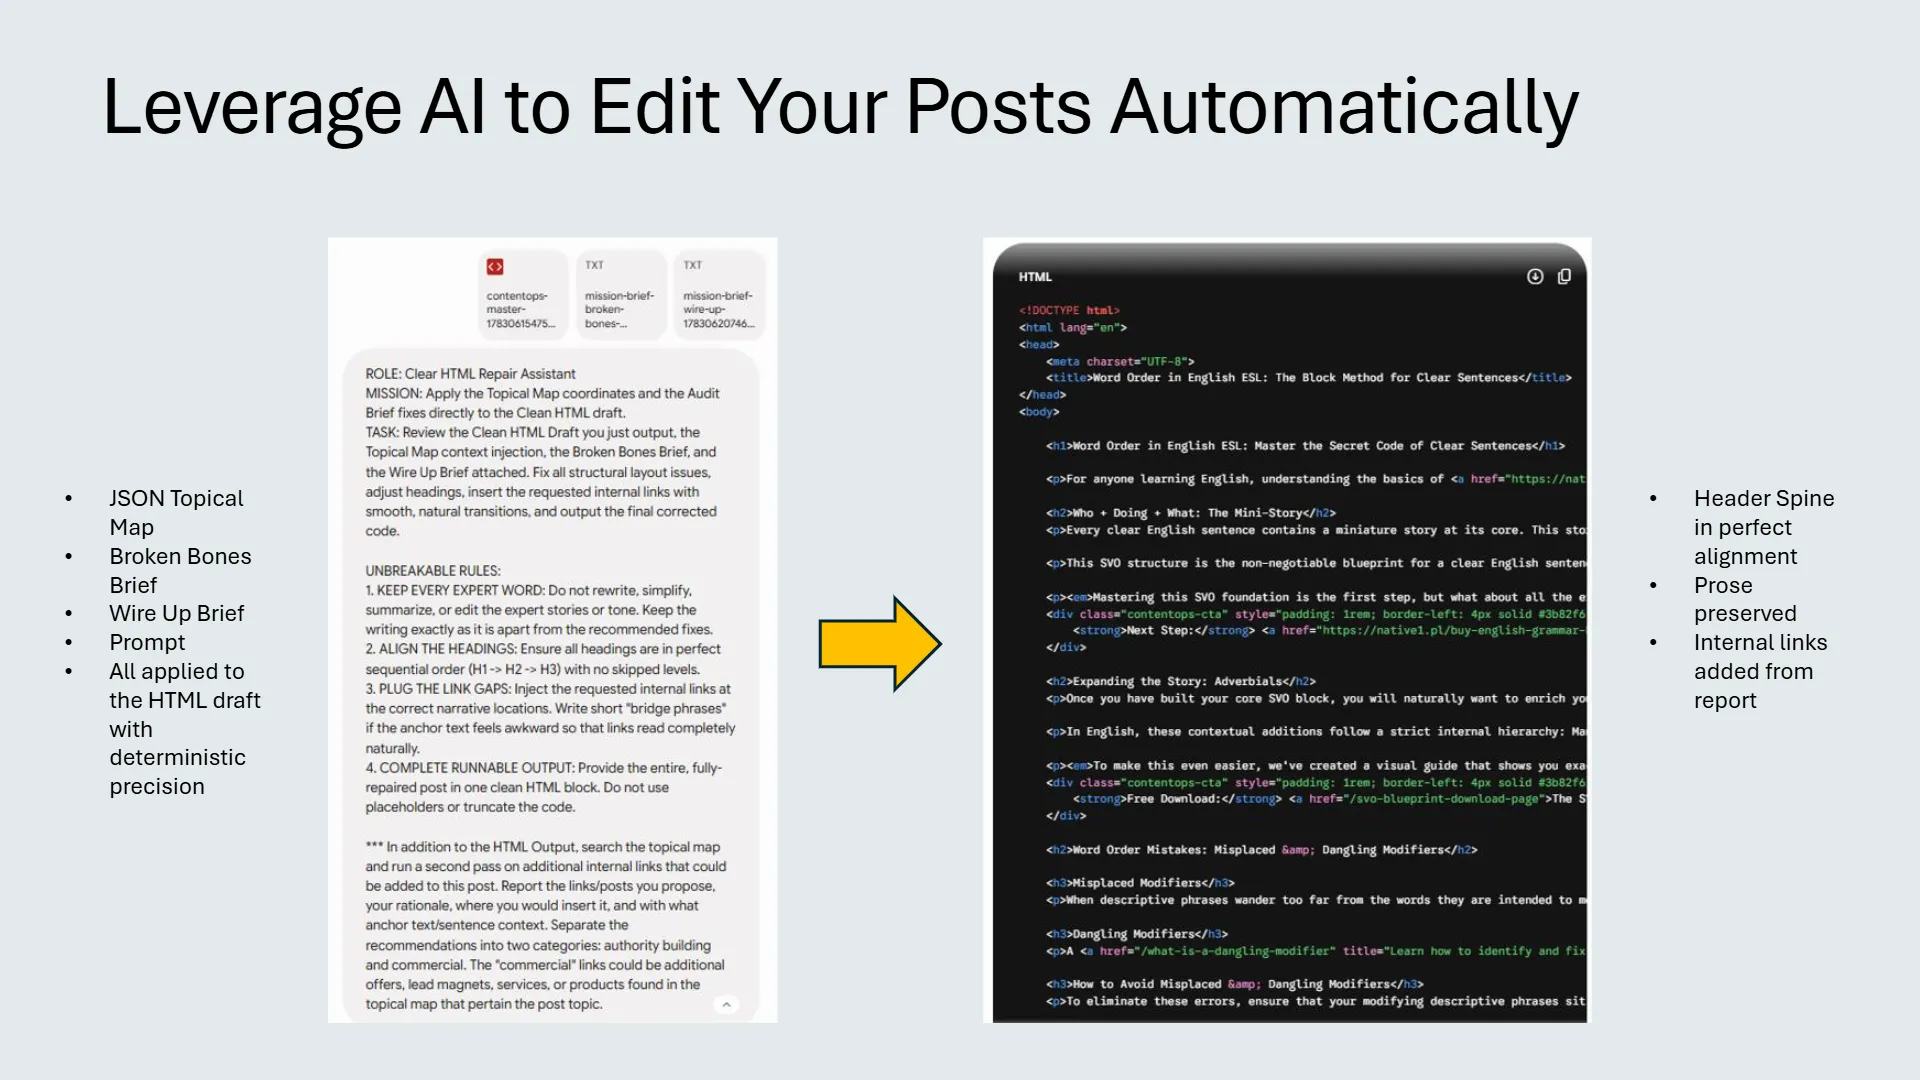
The second prompt applies structural intelligence to the clean HTML canvas. Four inputs go in simultaneously: the clean HTML from Phase 1, your JSON topical map exported from ContentOps, the Broken Bones brief from Audit Suite Mission 1, and the Wire Up brief from Mission 2. The AI reads all four and executes the fixes in a single pass.
ROLE: Clear HTML Repair Assistant
MISSION: Apply the Topical Map coordinates and the Audit Brief
fixes directly to the Clean HTML draft.
TASK: Review the Clean HTML Draft, the Topical Map context, the
Broken Bones Brief, and the Wire Up Brief provided below. Fix all
structural layout issues, adjust headings, insert the requested
internal links with smooth, natural transitions, and output the
final corrected code.
UNBREAKABLE RULES:
1. KEEP EVERY EXPERT WORD AND PRESERVE ALL PROSE: Do not rewrite,
   simplify, summarize, truncate, or delete any portions of the
   post. Keep the writing exactly as it is apart from the specific
   heading and link fixes.
2. ALIGN THE HEADINGS: Ensure all headings are in perfect
   sequential order (H1 to H2 to H3) with no skipped levels.
3. PLUG THE LINK GAPS: Inject the requested internal links at the
   correct narrative locations. Write short bridge phrases if the
   anchor text feels awkward so that links read completely naturally.
4. IGNORE MULTIMODAL INSTRUCTIONS: Image and slide refactoring is
   handled separately via SlideShift. Do not write, keep, or suggest
   image placeholders or figures.
5. COMPLETE RUNNABLE OUTPUT: Provide the entire, fully-repaired post
   in one clean HTML block. Do not use placeholders or truncate.
ADDITIONAL SECOND-PASS INSTRUCTION:
After the HTML output, search the topical map and run a second pass
to identify additional internal links. Separate recommendations into:
- Authority Building Links (related informational posts)
- Commercial Links (offers, lead magnets, services, products)
For each recommendation provide: Target URL and Title, Strategic
Rationale, Placement Insertion Point, Precise Anchor Text and
Sentence Context.
The Difference Between Switchboard Bridge Sentences and Cartilage
The Switchboard Prompt writes transitional sentences specifically to make each internal link feel earned rather than forced. A link that sits awkwardly over weak anchor text gets a one-sentence setup that makes the connection read naturally. These bridge sentences live inside the body text at link positions. They serve the links.
Cartilage is different. Cartilage sentences bridge bones to joints at the visual break points between text blocks and images. They live in their own HTML blocks between the text and the image. They serve the structure. The two are related but not the same, and they happen at different phases of the workflow for different reasons.
Phase 3 — Execute the Second-Pass Links
The Switchboard Prompt’s second-pass analysis returns a structured list of additional link opportunities: authority-building links to related cluster posts and commercial links to offers, services, and lead magnets in your topical map. Review the recommendations and confirm which ones to execute, then send this prompt:
Please execute each second-pass link recommendation, outputting
the full HTML draft with all links included. Use transitional
sentences built around relevant anchor text so as not to disrupt
the narrative flow of the post.
The output is the final, fully-corrected, fully-linked HTML document. This goes into the Splitter.
Phase 4 — Image Refactor via SlideShift
Drag-and-drop page builders like Elementor and Divi typically embed images in whatever format they were uploaded, often without meaningful alt text, often inside structural containers that obscure their relationship to the surrounding content. The SlideShift refactor converts those images into optimised WebP assets with didactic alt text that teaches the crawler what each image means in context of the post’s argument.
Step 1 — Extract and Prepare the Images
Copy each image from the existing post and paste it into an empty PowerPoint slide. Use PowerPoint’s Design Helper to resize the image to fill the full canvas area. This ensures the exported slide captures the image at full resolution without white borders or padding. Export the completed deck as a PDF.
This extraction step is what distinguishes the HTML Strip image refactor from the standard SlideShift workflow. You are not starting with a ready-made PDF. You are building one from the post’s existing image assets so SlideShift can process them with the post’s topical map context applied.
Step 2 — The SlideShift Seven-Step Sequence
- 01Pull the brief from the topical map node. The post title, context, and target keyword auto-fill from the node data.
- 02Upload the PDF.
- 03Generate HTML from slides. Automatic didactic alt text generation runs at this step, using the topical map context to write alt text that teaches rather than describes.
- 04Download the ZIP file and extract all WebP images.
- 05Upload the WebP images to the WordPress media library. Copy one image URL to clipboard.
- 06Paste the WordPress media library base URL into the designated SlideShift field. This populates the correct src paths for every image snippet.
- 07Download the HTML Snippets .txt file, or use the per-image Copy to Clipboard button on each slide preview.
The output is a set of optimised WebP image files and HTML figure snippets, each with a lazy-loading WebP src, didactic alt text, and a caption. Ready to paste directly into WordPress HTML Widgets.
Phase 5 — Modular Assembly in WordPress
You now have two sets of HTML assets ready: the Splitter’s modular text blocks and SlideShift’s image snippets. The Splitter blocks go in first. Once you switch context to SlideShift, the Splitter output is off-screen and easy to lose track of. Get all bones in place before touching the joints.
Step 1 — Paste Splitter Blocks First
Open the ContentOps Splitter and paste the final corrected HTML from Phase 3. The Splitter cuts at every H2 boundary and returns modular sections. In the Native 1 word order post this produced five sections. Copy each section and paste it into a waiting HTML Widget in WordPress. All bones in place.
Step 2 — Insert Joint Widgets
Between each bone, insert a new empty HTML Widget. These are the joint positions where the images will land. Don’t paste anything into them yet.
Step 3 — Paste SlideShift Snippets
Open the HTML Snippets .txt file or use the per-image Copy to Clipboard button. Paste each image snippet into its corresponding joint widget. Bones and joints are now in place.
Step 4 — Publish and Retrieve the Live HTML
Publish the post at this stage. The live published HTML, with bones and joints assembled, is the input for the cartilage pass. Press Ctrl+U to retrieve the full source HTML with everything in its correct position. This freshly published HTML is what you feed to the AI in Phase 6.
Phase 6 — The Cartilage Pass
The cartilage pass is the final phase and the highest-value injection point in the entire workflow. Each joint currently sits between two text blocks with no connective tissue. The reader transitions between text and image without guidance. The machine reads three separate HTML blocks with no declared relationship between them. Cartilage sentences fix both problems at the same time.
The Cartilage Prompt
Feed the freshly retrieved published HTML to your AI with this prompt:
Here is the published HTML of my post [paste Ctrl+U source].
Between each image joint and its adjacent text blocks, write a
short transitional HTML paragraph that bridges the bone above
to the image below, and the image above to the bone below.

For each cartilage injection:
- Keep it to one to two sentences
- Write it as a standalone <p> tag or short <div> block
  that can be styled independently
- Use the semantic context of the surrounding text to reinforce
  keyword signals and inject relevant semantic keyword variants
- Add structural signposts where appropriate to orient the reader
- Place in-line CTAs or offer references at joint positions where
  reader intent peaks
- Do not rewrite any existing body copy
Injecting the Cartilage Blocks
The output is a set of short HTML snippets, one per joint position. Each one bridges its bone to its image, reinforces the semantic signal at that exact break point, and gives you the option to apply independent styling to draw visual attention to the transition.
Insert a new HTML Widget between each joint and its adjacent bone. Paste the cartilage snippet into each one. If you want to bring additional visual distinction to the transition sentences, apply a subtle background tint, a slightly different font weight, or a thin border to the cartilage widgets. This signals to the reader that these sentences are pivot points rather than body copy.
Publish again. The post is complete: bones, joints, cartilage, all in place, all in HTML, all machine-readable.
The Bones/Joints/Cartilage Method
The Bones/Joints/Cartilage method is the assembly philosophy underneath the workflow. It names what every post is structurally made of once you stop thinking of it as a single continuous document and start treating it as a modular sequence of components with distinct structural roles.
Bones — The Text Blocks
Bones are the text blocks: the structured argument of the post, the prose and the headings, the semantic spine. The Splitter produces the bones by cutting the corrected HTML at every H2 boundary. Each bone is a self-contained HTML section that pastes into a single HTML Widget without reconstruction.
Joints — The Visual Teaching Layer
Joints are the images and media that sit between the bones, carrying the didactic information a text paragraph would take three times as long to convey. SlideShift produces the joints by converting the post’s images into optimised WebP assets with didactic alt text and ready-to-paste HTML figure snippets. Each joint occupies its own HTML Widget between two bones.
Cartilage — The Connective Tissue
Cartilage is the connective tissue between bone and joint: short transitional HTML blocks that bridge the text above to the image below and the image above to the text below. Declared as standalone HTML blocks, cartilage sentences can be styled independently, keyword-enriched with semantic variants, and used as micro-CTA positions at the exact visual break points where reader attention is recalibrating.
A post built on this method is not a wall of text with images dropped in for visual relief. It is a three-component architecture where every element has a structural role and every break point between components is an injection opportunity.
The Bones/Joints/Cartilage method is one station in the full AI content manufacturing workflow that takes a post from monologue to published asset.
Should I Use Elementor If I Care About SEO and AI Search?
This is the question underneath the whole post and it deserves a direct answer.
What Page Builders Are Actually Built For
Elementor and Divi solve a real problem: visual layout control without code. They solve it well for a specific use case — designing pages where the visual presentation is the primary goal. Landing pages, sales pages, portfolio layouts, contexts where the visual layer is the product. They were built for designers working on visual output, not for content operators publishing machine-readable posts at scale.
A page builder optimises for visual rendering. A machine ingests structural semantics. Those two goals produce different outputs from the same content, which is why a post can look professionally designed visually and be structurally broken semantically at the same time.
The HTML Strip as the Corrective
The HTML Strip and Rebuild workflow is not an argument against using page builders. It is the corrective for using them in a context they weren’t designed for. If you are going to continue building posts in Elementor or Divi, the workflow gives you a repeatable path from their output to a machine-readable document. If you are starting fresh, publishing directly in clean HTML from the outset eliminates the need for the strip entirely.
ContentOps sites publish in clean HTML from day one. The Wrapper produces it. The Splitter deploys it. There is no div soup to strip because the structural noise was never created in the first place.
A post that passes every visual checklist can still be structurally invisible to the machine reading it — which is the same problem the DMV Test exposes at the compliance layer.
FAQ: HTML to Semantic HTML Refactor for WordPress
How do I turn a messy Elementor post into clean HTML?
Use the Strip Prompt — an AI prompt that takes your page builder’s raw source HTML, retrieved via Ctrl+U, and returns a clean verbatim-preserved HTML document with all div soup, inline styles, and empty containers removed. The AI preserves every word exactly and restructures the content into standard semantic HTML tags. From there the Switchboard Prompt applies structural fixes and internal links, and the Splitter deploys the corrected document into WordPress as modular HTML blocks.
Can I fix a page builder post without rebuilding it from scratch?
Yes. The Strip Prompt preserves every word, sentence, and punctuation mark from the original. Nothing is rewritten, summarised, or shortened. The workflow strips the structural noise the page builder added while leaving the content the author wrote entirely intact. The heading spine gets corrected, the internal links get wired, and the images get refactored, but the post’s argument, voice, and substance remain exactly as written.
What is the difference between visual design and semantic HTML?
Visual design is what a page looks like in a browser — layout, spacing, colour, typography. Semantic HTML is the structural document underneath the visual layer — the hierarchy of headings that declares what the page is about, the paragraph tags that define body content, the anchor tags that route authority between pages. A drag-and-drop page builder like Elementor or Divi optimises for visual design. A search crawler and an AI answer engine read the semantic HTML. A post can look professionally designed visually and be structurally broken semantically, and the HTML to semantic HTML refactor corrects the semantic layer without touching the visual design.
What is didactic alt text and why does it matter?
Didactic alt text teaches the crawler what an image means in context of the page’s argument, rather than simply describing what the image looks like. A standard alt text says “chart showing three columns.” A didactic alt text says “comparison chart showing the nine workflow stages where briefing tools stop and ContentOps picks up execution, with each stage labelled by what each tool produces.” The didactic version gives a multimodal crawler the semantic context it needs to associate the image with the page’s entity relationships and include it in relevant visual search results. SlideShift generates didactic alt text automatically from the post’s topical map data.
How long does the full HTML to semantic HTML workflow take?
For a standard blog post of 1,500 to 2,500 words with four to six images, the six-phase workflow typically runs in under two hours for a solo creator who has the Audit Suite reports ready before starting. Phase 1 takes two to three minutes. Phase 2 takes five to ten minutes depending on the number of structural fixes flagged. Phase 3 takes two to three minutes. Phase 4 takes ten to fifteen minutes depending on the number of images. Phase 5 takes fifteen to twenty minutes. Phase 6 takes twenty to thirty minutes. The Broken Bones and Wire Up reports from the Audit Suite are prerequisites — run those before starting.
What is the best workflow for refactoring old WordPress blog posts?
Run the Audit Suite’s Broken Bones and Wire Up missions on the post’s HTML first to generate the diagnostic reports the Switchboard Prompt needs. Then run the six-phase HTML to semantic HTML workflow: strip the source HTML, apply the Switchboard fixes, execute second-pass links, refactor images through SlideShift, assemble modular blocks in WordPress, and run the cartilage pass on the published HTML. Rerun the Harvester in the post’s topical map node after publishing to register the updated internal link structure. Submit the URL to GSC and BWT for reindexing.
Is there a way to refactor WordPress content with AI without knowing code?
Yes, and the key is giving the AI the right inputs rather than the right prompts. An AI prompted with only “clean up my WordPress HTML” produces generic output because it has no structural intelligence to work from. The same AI given the clean HTML canvas, the JSON topical map, the Broken Bones diagnostic report, and the Wire Up internal link brief produces a precisely corrected document because it is working from actual structural data rather than inference. The workflow in this post is built on that principle — the AI is the execution engine, the ContentOps tools are the data sources that make the execution precise.
Should I use Elementor if I care about SEO and AI search?
Elementor is a capable visual design tool for pages where the visual layer is the primary product. For content-heavy blog posts where the structural layer needs to communicate entity relationships to a machine, it creates structural debt that requires the HTML Strip workflow to correct. If you are building new posts and SEO and AI citation are priorities, publishing in clean HTML from the outset is the more efficient path. If you have an existing Elementor-built backlog, the six-phase workflow gives you a repeatable system to convert those posts to semantic HTML without losing any content.
The four publishing tools this workflow runs on are each available as standalone free tools or as part of the full ContentOps Mothership:
- The Surgical HTML Auditor generates the Broken Bones and Wire Up briefs the Switchboard Prompt needs. Run it free at audit.contentops.so. Learn more about the full Audit Suite.
- The HTML Wrapper produces clean structured HTML for new drafts, eliminating the need for the Strip phase on posts built inside ContentOps from the outset. See all Publishing Accelerators.
- The HTML Splitter cuts the corrected final document into modular WordPress-ready sections for fast assembly. See all Publishing Accelerators.
- SlideShift refactors the post’s images into optimised WebP assets with didactic alt text and ready-to-paste HTML snippets. Learn more about SlideShift.